
Introduction
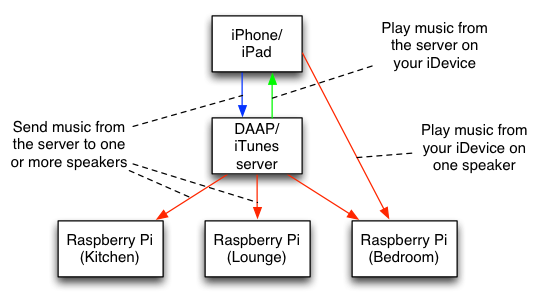
In this article I will explain how to set up a multi-room audio streaming system based on Apple iDevices, cheap Raspberry Pi players and any computer (either Linux, Windows or Mac). You will be able to do the following:
- Send sound from any app on your iPhone or iPad to any speaker in your home.
- Use your iPhone or iPad to control synchronised multi-room music - without your mobile device needing to stay connected.
- Play music from your PC/server on your iPhone or iPad.
You will need:
- One or more Raspberry Pi computers (in fact you can use any computer but this article covers the Pi). It will also work with an Airport Express or Apple TV.
- Powered speakers connected to the Pi's 3.5mm analog stereo jack.
- Either an ethernet connection or a wifi adapter that will work with Raspbian such as the Edimax EW-7811UN.
- Either a Windows/Mac computer running iTunes, or a Linux computer
- An iPhone/iPad with Apple's Remote app.
Diagram
Server Setup
In this reciple, the server is on all the time, and is where you store all your music. The server uses a protocol called DAAP to provide information about your music library (Artists, albums, tracks, cover art etc) to your iDevice, and can be controlled by your iDevice to send music to AirPlay speakers.
If you have a desktop PC or Mac then you can use that as your server, simply by having iTunes open. You need to setup iTunes to share your library and allow it to be controlled by your iPhone following Apple's instructions.
If like me you don't have an always-on iTunes-capable computer (all mine are laptops), then you can use any cheap computer (including a Raspberry Pi) running Linux and DAAP software. I use an HP MicroServer, but a large number of NAS devices will run forked-daapd (the software I will use in this article) and Synology NAS devices come with this functionality in their DSM software.
Installing forked-daapd
There is a large amount of good information about the version I use from the author, so I shall not repeat it. See his instructions for installing and setting up the software on a Raspberry Pi (yes you can use a Pi for the server as well as the AirPlay speakers), but his github project page also has instructions for compiling it from source to use on any Linux distribution.
The README page tells you how to set up your iDevice's Remote app to work with the server.
You will also want to follow the instructions to configure forked-daapd to find your music files. This will invovle editing the /etc/forked-daapd.conf file
AirPlay speaker setup
The recipe here will work with Apple's own AirPort Express and Apple TV devices, as well as any third party AirPlay-compatible speakers you may own. You can also make your own AirPlay speakers using a Raspbery Pi running shairport-sync, as follows:
Install Raspian
Download the latest Raspbian image, and follow Raspberry Pi's own instructions to install it on an SD card. When you first boot up the Pi with a monitor and keyboard connected, you will be prompted to run the raspi-config tool. Run this as instructed (see the guide) to:
- Change the hostname of your Pi (e.g. call it "bedroom").
- Expand the operating system to use all the available space on the SD card (otherwise you might run out of space).
- Change the password for the default user "pi".
- Enable SSH (remote access).
- Force your audio to analog (you probably don't need to do this).
Update your Pi
Update the Raspberry Pi firmware to the latest version:
sudo rpi-update
sudo reboot
After a reboot, update Raspbian:
sudo apt-get update
sudo apt-get upgrade
Setup Wifi
If you use a wired connection, you can skip this step.
You will want to set up your USB adapter so that it automatically connects to your home Wifi network.
First, check your hardware is working (drivers for popular adapters are installed in Raspbian by default):
ifconfig
If you see a paragraph about wlan0, your device is available. If not, look online for how to install the drivers.
Edit the /etc/network/interfaces file:
sudo nano /etc/network/interfaces
You want it to look like this:
auto lo
iface lo inet loopback

auto eth0
iface eth0 inet dhcp

auto wlan0
allow-hotplug wlan0
iface wlan0 inet manual

wpa-roam /etc/wpa_supplicant/wpa_supplicant.conf

wireless-power off

iface default inet dhcp
Next edit the wireless config file:
sudo nano /etc/wpa_supplicant/wpa_supplicant.conf
It should look like this:
ctrl_interface=DIR=/var/run/wpa_supplicant GROUP=netdev
update_config=1
network={
    ssid="YOUR_NETWORK_NAME"
    psk="YOUR_PASSWORD"
    scan_ssid=1
}
Log in via SSH
Once you have networking set up correctly, you can disconnect the keyboard and display and follow the remaining steps by logging into your Raspberry Pi from another computer via SSH. If you have a Pi model A or A+ and are using wifi you will likely have to do this because you only have one USB port - which you will need for your Wifi adapter.
To connect via SSH, follow the Raspberry Pi Foundation's instructions.
Install AirPlay software
The popular shairport software emulates an AirPort Express on Linux, and it is this that receives audio from your iPhone or your server and sends it to your speakers. There are a few versions of shairport, I use a derivative called shairport-sync. it is a bit more responsive - music plays quicker and it responds to volume changes quicker - and will synchronise music playing in different rooms, which is great for multi-room audio. The disadvantage is that, unlike shairport, you will need to compile it from source.
If you prefer to go the easy route with shairport, simply run:
sudo apt-get install libshairport1
To install shairport-sync instead, follow these steps:
1. Install dependencies:
sudo apt-get install autoconf libtool libdaemon-dev libasound2-dev libpopt-dev libconfig-dev
sudo apt-get install avahi-daemon libavahi-client-dev
sudo apt-get install libssl-dev
2. Download the shairport-sync source:
cd ~
git clone https://github.com/mikebrady/shairport-sync.git
3. Build and install:
cd shairport-sync
autoreconf -i -f
./configure --with-alsa --with-avahi --with-ssl=openssl
make
sudo make install
Configure AirPlay software (optional)
This step tells the software to use the hardware volume control on your Pi's internal sound card instead of the default, a lower quality software volume. It also sets the name that will be shown when you are choosing which speakers to send music to. It is not necessary, but recommended.
Edit the startup script for your Pi. Depending which version you installed above, it will be either:
sudo nano /etc/init.d/shairport
Or:
sudo nano /etc/init.d/shairport-sync
Find the line that looks like this:
start-stop-daemon --start --quiet --pidfile $PIDFILE --exec $DAEMON -- -d || return 2
You will want to edit this line so it looks like this:
start-stop-daemon --start --quiet --pidfile $PIDFILE --exec $DAEMON -- -d -a "Kitchen" -- -d hw:0 -t hardware -c "PCM" || return 2
Obviously you would replace "Kitchen" with the name you want to use.
Then update your system's init configuration to load the shairport daemon at startup:
sudo update-rc.d shairport-sync defaults
Reboot to finish
From the command line:
sudo reboot
Playing your iPhone's audio on a speaker
Once you have your AirPlay Pi up and running, you can test it by sending some music to it from your iPhone. In iOS 7 and 8, swiping up from the bottom of the screen brings up a dashboard with an "AirPlay" option. Tap it, select your Pi from the list. Sound from any app - such as Music or Podcasts or Spotify or YouTube - will be output on the Pi's speakers instead of the iPhone.
You can see some screenshots of this process on Apple's AirPlay support article. Remember, your Raspberry is emulating an AirPort Express so the process is exactly the same.
Playing music from your server on your speaker(s)
If you have a lot of music, your iPhone probably can't store all of it. You can however use the Remote app to remotely control iTunes (or forked-daapd). You can use this to pipe music stored on your server to your speakers. This means:
- The music does not have to be on your iPhone.
- Music is sent directly from your server to the AirPlay speakers, so music will continue to play if you close the Remote app or turn your iPhone off.
- You can select multiple speakers at once, to play music in multiple rooms.
Playing music from your server on your iPhone/iPad
If your server is a PC or Mac running iTunes, you can simply enable the Home Sharing function to stream music from your server and play it on your iDevice in the Music app.
Home Sharing replaces an earlier mechanism of doing this, and depends on your Apple ID which unfortunately means cannot be supported by forked-daapd. Therefore if you're using a Linux server you will have to use a different app like Simple DAAP Client.
Airplay-Speakers out of sync with "airplay-pi" via forked-daadp
Christian (not verified)
Hi, thanks for your awesome article.
I´m wondering, if your raspberry is also auto of sync with the other airplay speakers? This case orrcures by playing music via forked-daapd, only. When I stream music from (e.g.) iTunes to my Airplay-Speaker and the Raspberry pi Airplay, they are perfectly in sync. (On my raspberry pi is shairport-sync installed).
Thanks,
Christian
I don't actually have any
Andy Jenkinson
I don't actually have any other AirPlay speakers in the same house so can't test it. However you may want to read about the way shairport-sync works out the timing to use. There is a section called "Timing" on the main page here:
https://github.com/mikebrady/shairport-sync
I expect you will need to set the "default" timing to be something else and see how it affects the synchronisation. If you do find a good value you could suggest to Mike that he modify shairport-sync to automatically set it when it detects forked-daapd via the User Agent header (the User Agent is forked-daapd/<version>).
Airplay-Speakers out of sync with "airplay-pi" via forked-daadp
aceJacek (not verified)
Hi,
I faced similar problem. I solved it with empirically discovered --latency parameter of 102500.
Add to you config -L 102500
Good luck.
Problem with Daemon
Oscar Galvan (not verified)
Hello
First, thanks a lot for this tutorial.
I have a issue with daemon, when reboot don´t start shairport-sync.
Manually put this:
pi@raspberrypi ~ $ sudo /etc/init.d/shairport-sync status
[FAIL] shairport-sync is not running ... failed!
pi@raspberrypi ~ $ sudo /etc/init.d/shairport-sync start
Process 1982 died: No such process; trying to remove PID file. (/var/run/shairport-sync.pid)
Now try this:
pi@raspberrypi ~ $ sudo /etc/init.d/shairport-sync stop
pi@raspberrypi ~ $ sudo /etc/init.d/shairport-sync start
Now work fine, but I don´t know resolve daemon problem
Thanks for a novice!
problem with daemon
Joseph P. Galloway (not verified)
Yes I missed a step, after
Andy Jenkinson
Yes I missed a step, after creating your init script:
Background Hiss
Paul M (not verified)
Hi - first of all, thanks for the excellent article, it made installing shairport sync a doddle!
Trouble is I'm hearing a lot of hiss when streaming music to my Pi. Is this normal? I heard it on my stereo but it's more obvious if I plug headphones into the Pi.
I'm using a Raspberry Pi B+ and hear the hiss whether I stream from my MacBook or iPhone.
Thanks in advance!
RE: Background Hiss
Andy Jenkinson
I seem to recall one of my Pi's (either an B+ or A+) did have some hiss, audible especially when outputting silence. I started to investigate but in the end I changed my plans and used an original model B, and that was much better so I didn't need to.
The model B has a dedicated audio out port, in contrast to the shared video-audio port on the B+ and A+. My first suspicion would be the grounding of the 3.5mm cable. Make sure yours is the correct type and doesn't mix the ground and video pins - unfortunately different devices use different pin configurations rather than there being a single standard order. There are some diagrams on the web.
I had also found a comment suggesting to add a firmware option in config.txt:
disable_audio_dither=1
However, in the end it could just be the limitations of the Pi's audio output quality. You could consider adding a USB sound card but that is adding cost...
Hi Andy,
Paul M (not verified)
Hi Andy,
It was indeed the Raspberry Pi in the end as I had a discussion with the developer about the hiss. He suggested one of the cheap USB soundcards would solve the problem and it did. Good old Amazon sent me a "Sabrent USB External Stereo Sound Adapter" for £5.99 with next day delivery and it works a treat (http://www.amazon.co.uk/gp/product/B00IRVQ0F8)
Will have to try the old B model, but I'm sure I heard the sound was even worse on that.
Thanks for your help and a great article!
Hi - you need a ground loop
Lee (not verified)
Hi - you need a ground loop thingy, it sorted mine out and made it silent from it being a massive BUUUZZZZZ
This is helpful even in 2023
Rick (not verified)
This is helpful even in 2023 😀 Thanks!
Hi - great tutorial. Can I
Lee (not verified)
Hi - great tutorial. Can I ask please, if the program is updated on Github, how do we update it on the Pi?
Updating
Andy Jenkinson
For shairport, just do:
For shairport-sync, update the source code from github and re-install:
So as not to overwrite any customisations you made, the installation won't overwrite your initialisation script. Future updates could potentially include changes in the init script, you could always check the differences if you are feeling thorough:
Max2Play as SD-Card Image for Multiroom Audio Player
Stefan (not verified)
Hi,
thanks for the tutorial and the good introduction to multiroom audio! If anyone is looking for some preinstalled Airplay/Squeezebox Image that has additional features and comes with a webinterface to easy control everything you might have a look at Max2Play (http://www.max2play.com). Together with Squeezeplug and HiFiBerry there are some special releases for the Raspberry PI that work very good out of the box.
Looks like the audioplayer
Andy Jenkinson
Looks like the audioplayer part is actually a paid extension (10 euros), please correct me if I'm wrong.
The system looks to be an "all things to all men" bundle of lots of stuff. Personally I am wary of such projects as they rarely excel at everything. So if anyone tries it, I would be curious if the timing options are correct for synchronised multiroom audio, if it's stable etc.
Dependencies for Shairport-Sync build
Duncan Coombe (not verified)
You also need to add Sudo apt-get install libconfig-dev to get the tutorial to work (related to shairport-sync)
script in /etc/init.d/ missing after install (release 2.6)
sylvesta (not verified)
the new release seems not to copy the shairport-sync-script to "/etc/init.d/" while installation, but copying by hand from dir "shairport-sync/scripts" to dir "/etc/init.d/" finally worked
help
gat (not verified)
See the comment above yours:
Andy Jenkinson
See the comment above yours: you need to copy the init script to the /etc/init.d directory
Can the DAAP server also play music?
Jason (not verified)
Thanks for the great tutorial; I'm looking forward to trying it out. I hope to use a Raspberry Pi with forked-daapd as the server. I was wondering, is there a way to use this Pi with forked-daapd as both the server and an additional receiver? i.e., Could I install shairport-sync on the same Pi that is running forked-daapd and have it give me an additional set of speakers?
Thanks,
Jason
You could, but forked-daapd
Andy Jenkinson
You could, but forked-daapd (which you control with Remote) can send output to either the "local" audio out or to remote AirPlay speakers. So it may be that the speakers appear twice which could cause some issues. Why not try it?
Brilliant!
Rotten Ronnie (not verified)
I followed your guide for compiling and installing "shairport-sync" and did need to copy the ~/shairport-sync/scripts/* into my /etc/init.d/ directory after which I started the service and found my sister's mac recognized and was able to use the Pi as an airplay speaker.
Thanks so much for sharing. :D
Piped audio
Joe P (not verified)
Hi Joe,
Andy Jenkinson
Hi Joe,
I don't use pipe so I can't answer your question specifically, but if you look at what I wrote you'll see that I put the config options in the init script and don't use the with-configfile option either. If you run update-rc.d as I mentioned then this init script will be launched at startup.
So have you tried just editing the /etc/init.d/shairport-sync file with the options you want? You might run into trouble with the syntax for "--" because start-stop-deamon also uses that syntax to distinguish program arguments from start-stop-daemon arguments.
it appears that it is reading
Anonymous (not verified)
it appears that it is reading the config, but there's nothing tell it to run the pipe just because the pipe name is in the config
so i think i just need to add -o pipe to the daemon start ,
ie I've tested it with manually starting with just that option and it goes to the pipe named in the config correctly
thanks
J
Configure doesn't let me finish
Damiano (not verified)
Good Morning.
When I do this passage:
the syspem says:" autoreconf: 'configure.ac' or 'configure.in' is required"
What shall I.do?
Thank you Damiano
Startup
Mauser (not verified)
Joe,
Thanks so much for the instructions. Awesome. I am, however, unable to start forked-daapd on boot and can only start by service forked-daapd force-reload. I have tried editing rc.local (ugly fix I know), changing the users in the init.d and config files, and changing user permissions, but still no dice.
Does anyone know how to fix this issue?
Re: Startup
Andy Jenkinson
Afraid its very difficult to troubleshoot from here, but do the logs show anything. If you've been starting it manually and messing with changing users and different permissions then it could be permissions on the log file etc. Check the configured user is able to write to the file you specified and the directory it's in. Also make sure that the init script is actually scheduled to start (i.e. at the appropriate runlevel). If the defaults in the init script are wrong or you never ran update-rc.d to install the symlinks then it simply won't execute the init script on startup.
Andy
Unable to locate package shairport
Omar (not verified)
Hi, thanks for the great tutorial,
when attempting to install shairport-sync, i recieved a message saying:
Unable to locate package autoreconf -i -f
So I instead tried to install the normal version of shairport and I was again told:
Unable to locate package shairport
Please help!
Help Please!
Brad (not verified)
I am trying to build and install the shairport sync, and when I try to run "autoreconf -i -f" I get back an error message that says
"autom4te: cannot create autom4te.cache: No such file or directory
aclocal: error: echo failed with exit status: 1
autoreconf: alocal failed with exit status: 1"
I cannot figure out what this means and how to run the autoreconf action. Can someone please help? Thanks!
Re: Help please
Andy Jenkinson
It sounds to me like a permissions problem. Are you sure your user is the owner of the shairport directory? You didn't download it or run anything inside it with sudo or as root?
This is great!!!
Xi (not verified)
Hi Andy,
this is so simple and so coool. I just wanted to know if it still works. I am planning to make multiroom system with my RPIs.
Thank you
Xi
Honestly, I am not sure. I
Andy Jenkinson
Honestly, I am not sure. I don't use it any more since I switched to Google Play Music + Chromecasts and mostly Android devices. I suspect shairport still works, whether the instructions will work exactly as written I have doubts.